时间:2019-10-25作者:xp系统之家 来源:http://www.37m.cn
问题描述:
从ubuntu官网上下载了12.04的安装包,下了个usb installer,把系统烧到u盘以后,在u盘里run了下,总是出现下面的错误:
Cannot allocate resource for EisA slot 1
Cannot allocate resource for EisA slot 2
Cannot allocate resource for EisA slot 3
Cannot allocate resource for EisA slot 4
Cannot allocate resource for EisA slot 5
Cannot allocate resource for EisA slot 6
Cannot allocate resource for EisA slot 7
Cannot allocate resource for EisA slot 8
解决方法:
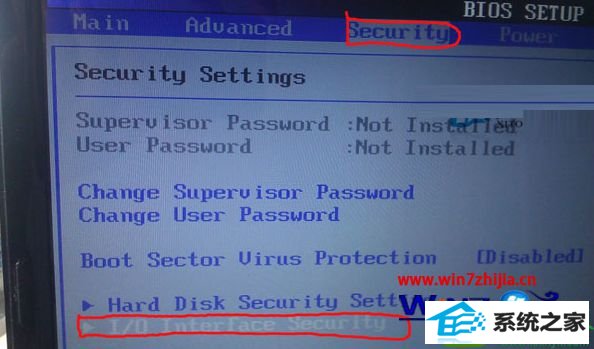
1、华硕win10系统电脑开机的时候,按F2进入bios设置,选择security选项;

2、按键盘上的上下键,把光标移动到i/o interface security 选项,敲回车;

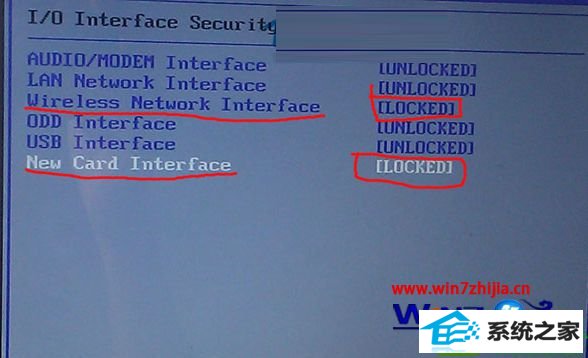
3、默认情况下,这里面的所有的选项都是UnLoCKEd 将最后一个选项new Card interface 设置为LoCKEd 这样就可以进入系统了。
注意:有人提到要将wireless network interface 也设置为LoCEd 这样有利于安装,要注意:odd interface 和UsB interface 千万不要设置为LoCKEd 这样就关闭了UsB 和光驱的功能。装完系统以后要把new Card interface 设置为LoCKEd,否则ubuntu 12.04将启动不了,其他的都要设置为UBLoCKEd,到这里,基本上系统装的就没问题了。
以上就是关于win10系统华硕F81se电脑安装Ubuntu12.04出错导致安装失败如何解决的全部内容,遇到这样问题的用户就可以通过上面的方法进行解决了,这样你的电脑就可以使用上Ubuntu 12.04系统了,大家不妨可以尝试一下。
本站发布的ghost系统与电脑软件仅为个人学习测试使用,不得用于任何商业用途,否则后果自负!